:::: MENU ::::

Software testing enthusiast.

Showing posts with label Automation Testing. Show all posts
This article is a part of the Cypress Test series. To read another story in this series, please follow the links below:

Cypress Test Series:


In this article, I will show you how to create custom commands in Cypress.
Cypress Custom Commands
Cypress Custom Commands

What are Custom Commands in Cypress?


Cypress custom commands are commands that are described by the user and used to create repeating steps in an automation test. By using custom commands you only need to define the command once and only use one line to call those commands.

Syntax


The syntax for the custom commands in Cypress is as follows:
Cypress.Commands.add(function-name, func)

Cypress.Commands.add(function-name, options, func)

Cypress.Commands.overwrite(function-name, func)


  • function-name is the name of the command you are about to invoke.

  • func is a function that accepts the arguments passed to the command.

  • opts is an optional parameter used to describe the implicit characteristics of a custom command.


How to implement custom commands in Cypress?


For this article’s simulation, I will use a dummy test automation website from zero.webappsecurity.com.

This site is not a real banking site and any similarities to third-party products and/or Web sites are purely coincidental. To access the website, you can click the link below.

http://zero.webappsecurity.com/index.html

Suppose our application has a scenario where we need to log in to a website before we can do the real test within the user page. In doing so, we need to clear cookies and local storage. Then insert the username and password into the user_login and user_password fields. After that click remember_me and Sign in button

So, instead of invoking the get() and click() commands before every test scenario, we can add a new custom command which will execute the login procedure every time it is called. So, to achieve the result, we can declare a new custom command as follows. The script below is the implementation of a custom command in commands.js
Cypress.Commands.add(‘login’, (username, password) => {
cy.clearCookies()
cy.clearLocalStorage()
cy.get(‘#user_login’).type(username)
cy.get(‘#user_password’).type(password)
cy.get(‘#user_remember_me’).click()
cy.contains(‘Sign in’).click()
})

And, now it’s time to invoke the command:
describe(‘Login with Custom Command’, ()=>{
it(‘should execute custom command’, () => {
cy.visit(‘http://zero.webappsecurity.com/login.html');
cy.login(‘username’, ‘password’)
});
})

So, it will call the login command and pass the parameter ‘username’ and ‘password’. Both parameters will be used as input values for the user_login and user_password fields. This way, we can execute login only using one line rather than typing every step in the login procedure.

Run the Cypress, and you will get the result as follows:
Result of custom command execution in Cypress

Custom command result

You can see in the log that the commands in the custom command are being executed.
This article is a part of the Cypress Test series. To read another story in this series, please follow the links below:

Cypress Test Series:


In this article, I will show you how to create a constant that contains an HTML path in Cypress.
How to Save an HTML Path Into a Constant

Sometimes, when creating tests for the front end, we need to access elements under the long HTML path. It will be troublesome if we need to assert elements under the same long path. The workaround I suggest is to save the path into a constant then we call the constant to assert the element.

To achieve the result, we can implement the script below:
describe('Login with Cypress.$ Function', ()=>{
before(function() {
cy.visit('http://zero.webappsecurity.com/login.html');
})

it('should execute login procedure', () => {

const userLogin = cy.get('#user_login')
const userPassword = cy.get('#user_password')
const userRememberMe = cy.get('#user_remember_me')
const signInButton = cy.contains('Sign in')

userLogin.type("username")
userPassword.type("password")
userRememberMe.click()
signInButton.click()
});
})

That script will save the user_login, user_password, user_remember_me, and Sign in button to a constant, then we can call the constant to create an assertion.
End to end testing using cypress: fixtures
Cypress Fixture

In this article, I will show you how to separate test data from the test script. While designing a Test Automation Framework, it is important to segregate the test scripts from the test data. With help of fixtures, Cypress is capable to do that.

What is a fixture in Cypress?


Cypress fixtures are used to store test data for automation, and the fixtures folder is placed inside the Cypress project. The fixtures folder contains JSON files, which contain test data that can be read by multiple tests. We store this data in a key-value format, which allows us to access it in our test scripts.

How to use Fixtures in Cypress Tests?


For this article’s simulation, I will use a dummy test automation website from zero.webappsecurity.com.

This site is published by Micro Focus Fortify for the sole purpose of demonstrating the functionality and effectiveness of Micro Focus Fortify’s WebInspect products in detecting and reporting Web application vulnerabilities.

This site is not a real banking site and any similarities to third-party products and/or Web sites are purely coincidental. To access the website, you can click the link below.

[embed]http://zero.webappsecurity.com/index.html[/embed]

Write the test data


The test data is stored in the fixtures folder:
Fixtures folder in cypress hierarchy

Fixtures folder in cypress hierarchy

Within the folder, create a file in JSON or other formats, and the data is maintained in “key:value” pairs. For this login simulation, I will create JSON and name it user.json. We can specify our test data with the following values:
{
“username”: “invalid_username”,
“password”: “invalid_password”
}

The implementation automation testing in Cypress is as follows:
describe(‘Login with Fixture Data’, ()=>{
it(‘should try to login’, () =>{
cy.visit(‘http://zero.webappsecurity.com/login.html')

cy.fixture(‘user’).then(user => {
const username = user.username
const password = user. password

            cy.get(‘#user_login’).type(username)
cy.get(‘#user_password’).type(password)

            cy.contains(‘Sign in’).click()
})
})
})

As we can see, I use cy.fixture to call the data from the fixture file “user.json” and use the values obtained to fill in the username and password fields. Save the above test files as and run the test as per the steps mentioned in the article “Cypress Test: Create your first End-to-End Testing”.

Loop a dynamic test data


In this section, I will show you, how the fixture file is consist of an array and want to use all the data as test data. I will create JSON and name it userDynamic.json with the following values:
{
“data”: [
{
“username”: “username1”,
“password”: “password1”
},
{
“username”: “username2”,
“password”: “password2”
}
]
}

The implementation automation testing in Cypress is as follows:
describe(‘Login with Fixture Data’, ()=>{
it(‘should try to login’, () =>{
cy.visit(‘http://zero.webappsecurity.com/login.html')

cy.fixture(‘userDynamic’)
.its('data')
.then(user => {
user.forEach((user) => {
const username = user.username
const password = user. password

                cy.get(‘#user_login’).type(username)
cy.get(‘#user_password’).type(password)

                cy.contains(‘Sign in’).click()
})
})
})
})

Save the above test files as and run the test. It will iterate array data from dataDynamic.json and use the values obtained to fill in the username and password fields.

Conclusion


The fixture provides segregation between test data and test script and allows the uses external data to be used in the test. It also allows the test to use multiple input data.

Follow me on


Facebook: https://www.facebook.com/mydoqa/

Instagram: https://www.instagram.com/mydoqa/

Twitter: https://twitter.com/MydoQa

This article is a part of the Cypress Test series. To read another story, please follow the links below:

Cypress Test Series:

API Test Series:

Software Testing Series:

Resources


[embed]http://zero.webappsecurity.com/index.html[/embed]

[embed]http://zero.webappsecurity.com/index.html[/embed]
The viewport is used to control the size and orientation of the screen for your application.
How to Emulate Different Devices Using Viewport
Emulate Different Devices Using Viewport

This is an example of how to use a viewport to emulate different device’s screens:
describe('Device Tests', () => {
it('1080p', () => {
cy.viewport(1980, 1080);
cy.visit('https://books.toscrape.com/')
cy.wait(3000);
});

it('iPhone X', () => {
cy.viewport('iphone-x');
cy.visit('https://books.toscrape.com/')
cy.wait(3000);
});
})

As we can see together, I use cy.viewport to declare the size of the screen. In addition to using the size of the resolution, the viewport can also be defined using the type of device.

Save the above test files as and run the test as per the steps mentioned in the article “Cypress Test: Create your first End to End Testing”.

Now, you can see, Cypress will open the site using two different devices screen.
The figure below is a screen for desktop

Cypress viewport screen for desktop

Screen for desktop

The figure below is a screen for iPhone X

Cypress viewport Screen for iPhone X

Screen for iPhone X

Conclusion


Using the viewport, we can simulate testing using various screen sizes

Follow me on


Facebook: https://www.facebook.com/mydoqa/

Instagram: https://www.instagram.com/mydoqa/

Twitter: https://twitter.com/MydoQa

This article is a part of the Cypress Test series. To read another story, please follow the links below:

Cypress Test Series:

API Test Series:

Software Testing Series:

This article is a continuation of the QA technique series. To read previous articles in the same series, you are welcome to follow the link below.


QA Techniques: Black Box Testing


If in the previous article I wrote about black box testing, in this article I will write about white box testing,


White box testing


What is White Box Testing?


White box testing is a software testing method that takes advantage of an internal view of the software code.


It is called a ‘white box’ because you can see inside an application’s source code and observe the way it is put together. With white box testing, test data enters the system via parameters, variables, and stored procedures and exits through return codes and stored procedures. This allows you to follow logic paths through the system as well as error-handling paths.


White Box Testing Techniques


White box testing is a technique that allows you to test your code at the source level. This means that you can test every line of code in a module or class. It also means that you can test the relationships between different modules and classes.


White box testing techniques include statement coverage, branch coverage, condition coverage, basis path testing, graph notation, Cyclomatic Complexity, and loop testing.


Statement coverage


Statement Coverage is the most basic and fundamental test coverage technique.


It focuses on testing all individual statements in a program at least once. Thus every node in the flowchart is tested.


Although this may seem trivial, it helps to achieve 100% statement test coverage. Because of this, it’s often considered a minimum requirement for any level of testing.


Branch Coverage


Branch Coverage ensures that the test for every possible path (if-else and loops) has been executed at least once by running all combinations of boolean expressions.


The idea behind branch coverage is that each decision condition should be tested with both true and false values; covering these branches is an important step toward achieving full branch coverage.


Branch coverage may also be referred to as condition-decision coverage or decision-branch coverage.


Condition Coverage


Condition Coverage ensures that every conditional statement has been evaluated at least once by running through all possible combinations of boolean expressions.


For example, there are conditions; X<0 and Y>0. Then we’ll have 4 possible conditions; TRUE and TRUE, TRUE and FALSE, FALSE and TRUE, and FALSE and FALSE.


Basis Path Testing


Basis path testing is a method that allows test case designers to make measurements of the logical complexity of the procedural design and use these measurements as a guide for defining the basis set of execution paths.


Test cases created to test the basis set are guaranteed to execute every statement in the program at least once during testing


Flow graph notation


This technique uses a directed graph to identify all possible paths and then maps those paths to create tests for them.


The graph is consist of nodes, decision nodes, junction nodes, and edges, and each node represents a sequence or decision point.


Cyclomatic Complexity


Cyclomatic complexity is used to determine the number of paths that need to be searched.


Cyclomatic complexity is a software metric that provides a quantitative measure of the logical complexity of a program. The value calculated for cyclomatic complexity determines the number of independent paths in the base set of a program and provides the minimum number of tests that must be performed to ensure that all statements have been executed at least once.


Loop testing


This test is mandatory to test various loops in the program, such as do-while, for, and while. In this test, you can also check the condition of the loop, whether it is running correctly or not.


Advantages of White Box Testing


  1. White box testing is very thorough so it can increase accuracy in implementing software.


  2. Makes it easy to find errors or bugs in software that were not previously seen.


  3. Can be executed early so that it can detect bugs early.


  4. Facilitates testing because it is carried out thoroughly so as to minimize the possibility of errors in the code.


Disadvantages of White Box Testing


  1. Quite complex.


  2. Hard to maintain, because if there is any changes in the code, we need to rewrite the testcase.


  3. Consumes a lot of resources because White-box testing is a fairly expensive test.


  4. Expensive.


Conclusion


So, we already talk about White Box Testing, as a part of the Testing Technique series. We already talk about the definition of white-box testing, the technique of white-box testing, also the advantages and disadvantages of white-box testing.


I hope we can learn something new every day.


Don’t forget to follow my other social media


Facebook: https://www.facebook.com/mydoqa/


Instagram: https://www.instagram.com/mydoqa/


Twitter: https://twitter.com/MydoQa


https://www.youtube.com/@mydoqa


Resources


[embed]https://k-hartanto.medium.com/qa-techniques-black-box-testing-637afc122e10[/embed]


[embed]https://k-hartanto.medium.com/qa-techniques-black-box-testing-637afc122e10[/embed]


[embed]https://k-hartanto.medium.com/qa-techniques-black-box-testing-637afc122e10[/embed]


[embed]https://k-hartanto.medium.com/qa-techniques-black-box-testing-637afc122e10[/embed]


[embed]https://k-hartanto.medium.com/qa-techniques-black-box-testing-637afc122e10[/embed]

Now you can also read about White Box Testing from the link below:

[embed]https://k-hartanto.medium.com/qa-techniques-white-box-testing-fecf9779b374[/embed]

Quality assurance is used to test software, when executing testing, we need to use a technique, so our testing can be done with minimum cost. In this article, I’ll talk about black box testing as a way to evaluate the quality of an application.

Black box testing
Black box testing

What is Black box testing?

Black box testing definition is a type of software testing in which the functionality of the software is not known. The testing is done without the internal knowledge of the products and their internal structures, so it’s frequently called “black” box testing.

Black box testers focus on finding defects that lie within their black-boxed system rather than trying to figure out how they work from an internal perspective.

They usually verify whether user interfaces do what they’re supposed to do by looking at input/output data provided by users or automated tests running against them.

Why do we need Black box testing?

Black box testing is a type of software testing in which the software’s functionality is unknown. The testing is done without internal knowledge of the products and their user interface.

Black box test cases help you provide maximum coverage with minimum test cases because they don’t have any external dependencies like user interaction or other factors that can affect your test results.

Black box testing techniques

Equivalence Partitioning

Equivalence Partitioning
Photo by Will Francis on Unsplash

Equivalence class partitioning is a black box testing technique that divides the input domain of the software under test into several equivalence classes.

For example — “userId” field is consist of 32 alphanumeric characters. So, we divide the input into; > 32 digits (invalid), =3 2 digits (valid), < 32 digits (invalid).

Boundary Value Analysis

Photo by Kevin Butz on Unsplash

The boundary value analysis focuses on detecting and correcting boundary conditions in cases where unexpected results occur because of these variables’ values.

For example — To enroll in classes, the valid student “age” range should be between 15–25. Then the test will be; 15 and 25 for the valid range, and 14 and 26 for the invalid range.

Decision Table Testing

decision
Photo by Alex Gorin on Unsplash

Decision tables are a great way to test the functionality of your application. They allow you to create complex business rules, document them, and apply them at runtime.

We use decision tables when we need to execute complex business rules. The input combinations and corresponding outputs are listed in a table, creating test cases.

For example — below is a simple decision table. It shows the eligibility of students to enroll a class in this semester. Students are eligible to register if their age is within range, pay an admission fee, admitted to this semester, and not being suspended.

╔══════════════╦═══════════════╦═══════════════╦═══════════════╗
║ condition ║ combination 1 ║ combination 2 ║ combinations 3║
╠══════════════╬═══════════════╬═══════════════╣═══════════════╣
║ age ║ Y ║ Y ║ Y ║
║ admission fee║ Y ║ Y ║ Y ║
║ admitted ║ Y ║ Y ║ N ║
║ suspended ║ Y ║ N ║ N ║
╚══════════════╩═══════════════╩═══════════════╩═══════════════╝

State Transition Testing

state transition
Photo by Damon Hall on Unsplash

State Transition Testing is a black box testing technique that is used to validate the functionality of the software against state changes. This can be done by writing tests using specific values twice.
State Transition Testing helps you to identify the possible transition for your application during runtime.

For example — You simulate a student that enrolls in a class using valid values, then enrolls in the very same class again using the same values. The first enrollment will succeed. Meanwhile, the second enrollment will result in a failure.

Use Case Testing

Photo by Brands&People on Unsplash

Use case testing is a black box testing technique that uses use cases to test the functionality of a component or system. The tester without any internal knowledge of the component or system creates use cases and uses them to test the functionality. Use cases are documents that describe an interaction between actors (i.e., users) and/or objects (i.e., components).

Error Guessing

Photo by charlesdeluvio on Unsplash

Error guessing is a technique that helps testers find defects in the system. It’s a simple technique and can be used by testers with little or no programming knowledge.

It involves testing all possible combinations of inputs and outputs, then comparing them to what you expect to see based on your previous experience with the product or service you’re testing.

If there are errors left over after this process, then something has gone wrong somewhere in your system!

Conclusion

We hope that you have learned something from this article. We know that testing can be a difficult field, but it is also one of the most important for your organization. As always, we are here to help you learn more about what we do and how we do it. Please keep in mind that every project is unique and has different requirements so feel free to contact us if you have any questions or concerns!

Follow me on

Facebook: https://www.facebook.com/mydoqa/

Instagram: https://www.instagram.com/mydoqa/

Twitter: https://twitter.com/MydoQa

Resources

[embed]https://k-hartanto.medium.com/qa-techniques-white-box-testing-fecf9779b374[/embed][embed]https://k-hartanto.medium.com/qa-techniques-white-box-testing-fecf9779b374[/embed][embed]https://k-hartanto.medium.com/qa-techniques-white-box-testing-fecf9779b374[/embed]

This article will show how to create basic End to End testing using Cypress.


What is End-to-End (E2E) Testing?

End-to-end testing, often abbreviated as E2E, is a testing technique that tests an entire product or an entire piece of software. This test is carried out from start to finish to ensure the application flow behaves as expected. E2E test can be interpreted in the abstract is to validate the workings of an application or website from the point of view of a user.

Automate End-to-End (E2E) Testing in Cypress

For this article’s simulation I will use dummy test automation website from books.toscrape.com. This site is good enough for practice purpose. It simulates e-commerce site so we can practice as if create automated testing for e-commerce website. To access the website, you can click the link below.

[embed]https://books.toscrape.com/[/embed]

Preparation

I’m assuming, you already installed the prerequisite software. In this tutorial I use:

  • Windows 11
  • Visual studio version 1.52.1
  • Node js v14.16.1
  • Cypress version 10.9.0

Of course you can use other version, but the details maybe slightly different.

Write the test

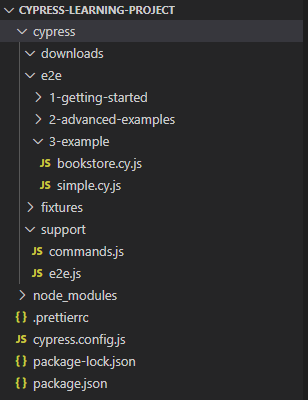
Now we are ready to create end to end test in Cypress. First create bookstore.cy.js file under folder “cypress/e2e/3-example”. My project structure is look like this.

Within the file, write the describe() function. Describe() function comes from mocha bundled library as cypress adopt mocha BDD syntax. It provides a way to keep tests easier to read and organized.

describe(‘Browser Actions’, () => {

})

In this test scenario I will divide the test into 3 segments: Visit the page, click a hyperlink, and verify an element.

Step 1: Visit the page and validate the url return

To visit a page, write down the code below within the describe() function.

it(‘should load correct url’, () => {
cy.visit(‘https://books.toscrape.com/', { timeout: 10000 })
cy.url().should(‘include’, ‘toscrape.com’)
})

it() is used for an individual test case. it() takes two arguments, a string naming our test, and a callback function which contains our actual test.

The code above can be broken-down into:

cy.visit(‘https://books.toscrape.com/', { timeout: 10000 }) will open page books.toscrape.com with 10 seconds timeout. cy.url().should(‘include’, ‘toscrape.com’) will verify the returned url should contain string “toscrape.com”.

Step 2: Click a hyperlink and validate the opened page

To visit a page, write down the code below under the previous it() function.

it(‘should Click on Travel category’, () => {
cy.get(‘a’)
.contains(‘Travel’)
.click()
cy.get(‘h1’).contains(‘Travel’)
})

The code above can be broken-down into:

cy.get(‘a’).contains(‘Travel’).click() will inspect “a” html element and click an element that contains “Travel”. cy.get(‘h1’).contains(‘Travel’) will verify that the opened page contains string “Travel” as an h1.

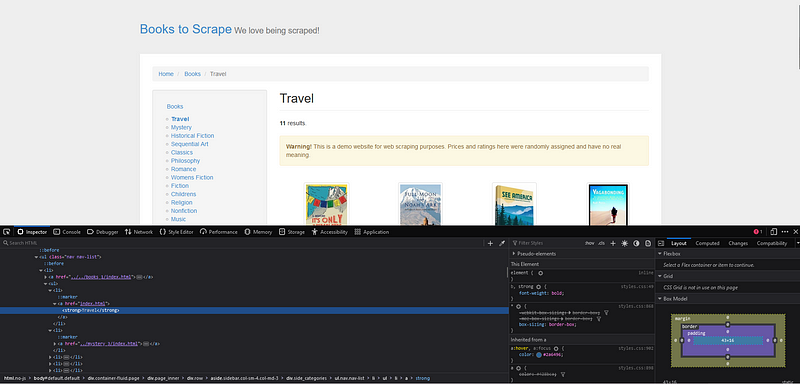
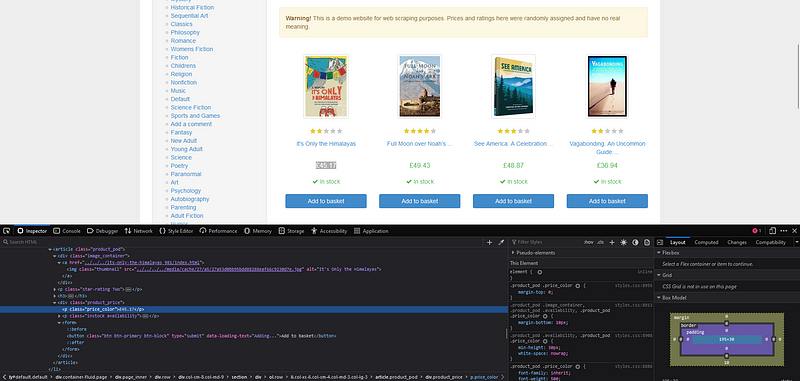
To know where the element is located, we can open our web browser and open the page. After that, find it in inspect element. In this scenario string “Travel” is located in “a” element.

Step 3: Verify an element in the opened page

In this step I will add another assertion, which is make sure the first book contain correct price. Please write down the code below under the previous it() function.

it('should show correct price', () => {
cy.get('.product_pod .product_price')
.contains('£45.17')
})

The code above contain a method that will search an HTML class .product_pod then go down to class .product_price. We add . in front of class name but nothing in front of HTML element. After we get price element, make sure that the value is £45.17.

To know where the price is located exactly, you can find it in inspect element, like above.

After we write down the code, complete code will be looks like this:

describe(‘Browser Actions’, () => {
it(‘should load correct url’, () => {
cy.visit(‘https://books.toscrape.com/', { timeout: 10000 })
cy.url().should(‘include’, ‘toscrape.com’)
})

it(‘should Click on Travel category’, () => {
cy.get(‘a’)
.contains(‘Travel’)
.click()
cy.get(‘h1’).contains(‘Travel’)
})
    it('should show correct price', () => {
cy.get('.product_pod .product_price')
.contains('£45.17')
})
})

Launch the Launchpad

Now, run the cypress using following command:

npm run cypress open

Choosing a Testing Type

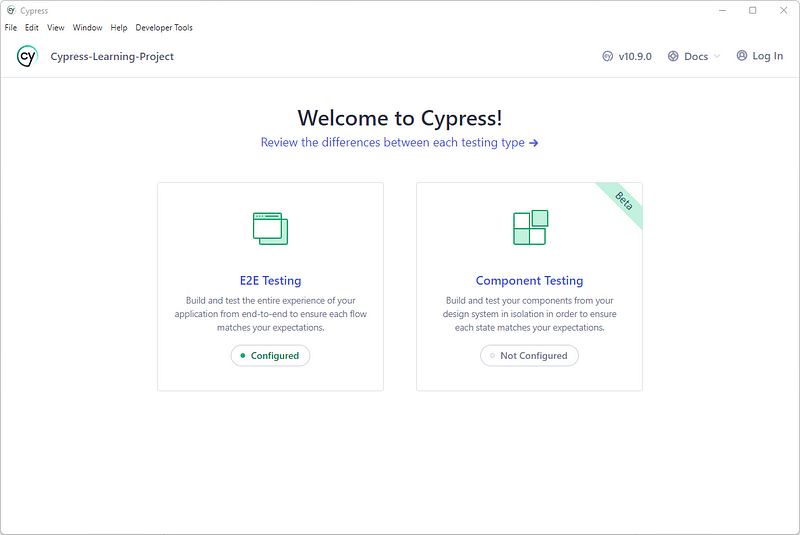
It will open Cypress Launchpad. The Launchpad offers two biggest decision first: What type of testing to do. E2E Testing, Which will run the whole application and open pages to test them. Or Component Testing, Which isolate individual component of application and test it.

Cypress Launchpad

Launching a Browser

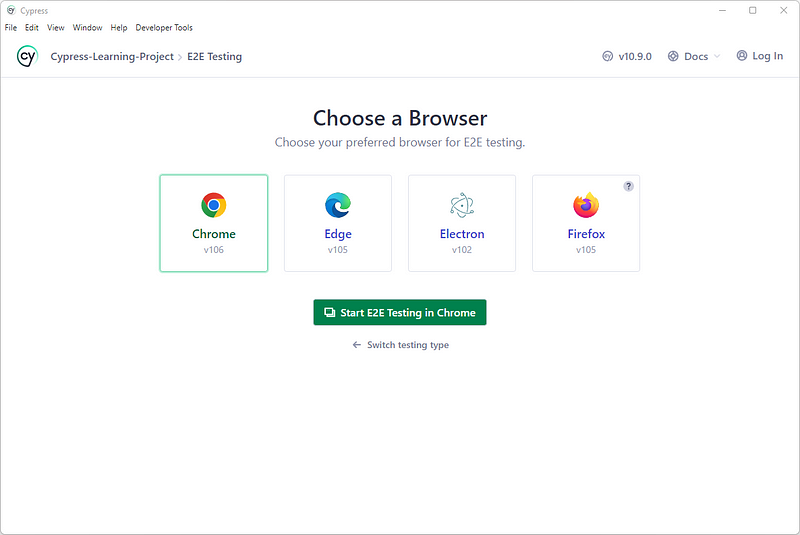
Lastly, Cypress will presents list of compatible browsers Cypress found on your system.

This time I will use Chrome, we can always change it later.

Run the test

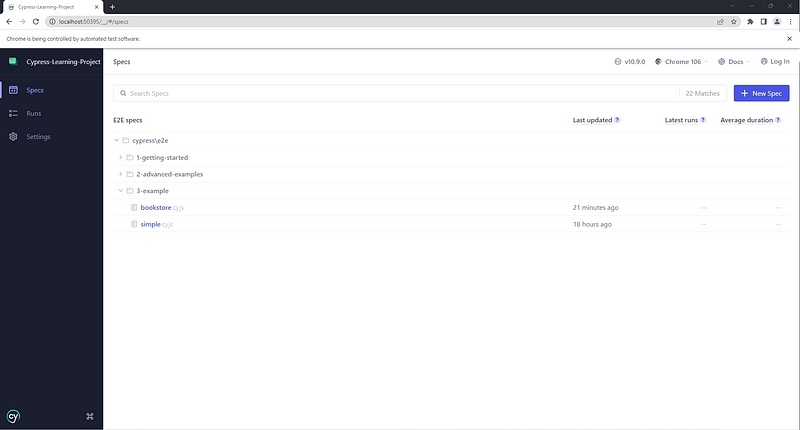
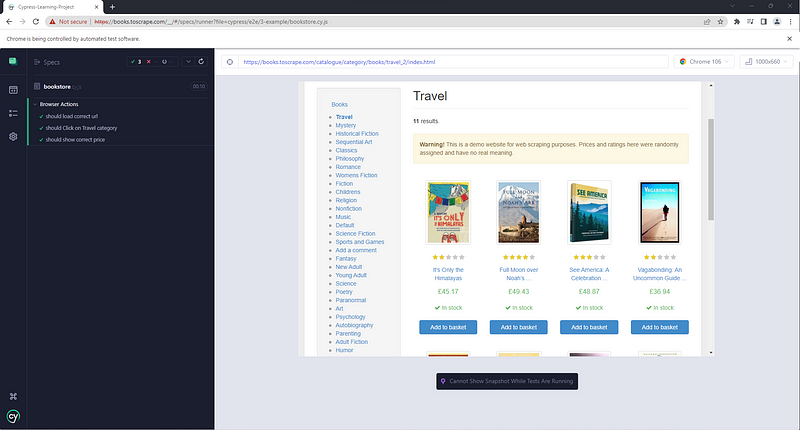
Our test is located under E2E specs/3-example. Click bookstore.cy.js and wait until Cypress open books.toscrape.com.

As we can see right now, all the test is succeed.

All the test cases that I show you above are positive cases. You can also create scenario that covers negative cases.

Resources

[embed]https://books.toscrape.com/[/embed][embed]https://books.toscrape.com/[/embed]

Follow me on

Facebook: https://www.facebook.com/mydoqa/

Instagram: https://www.instagram.com/mydoqa/

Twitter: https://twitter.com/MydoQa

In this article I will show how to create basic request in postman.

Basic Features

Before creating postman request, first let me show you postman basic features. I will show features like

  • Params — Allows you to add query parameter in request URL
  • Authorization — It might be basic authentication, bearer token, or just simply username and password
  • Headers — Where you will write needed header for the request
  • Body — This is where you put customization values.
  • Pre-request Script — Executed before running the request. You can add environment variables or test preconditions here.
  • Tests — This is where you put our assertion script for the test. It is important to add assertion for each request so we know whether the request is succeed or not.

Create Our Request

Now after we know Postman’s basic features, we are ready to create our first postman request. For this article’s simulation I will use demo site from dummyjson. You can access the swagger here:

[embed]https://dummyjson.com/docs/products[/embed]

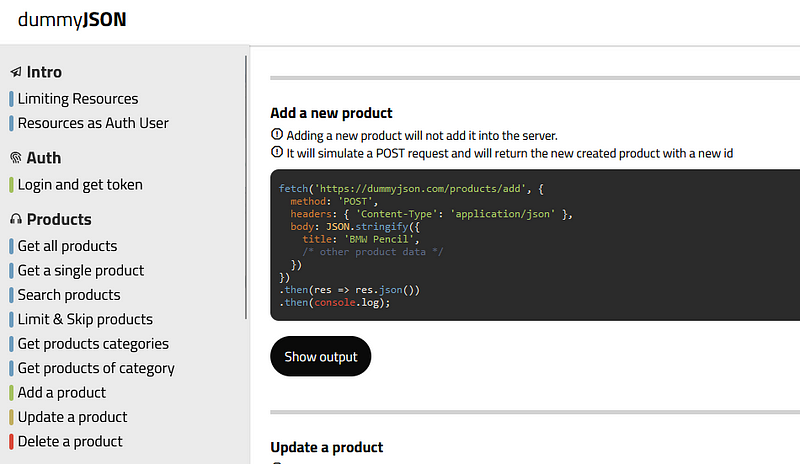
For this simulation I will use endpoint “Add a new product”. This endpoint will simulate POST request and mock a create new product behavior.

Add a new product simulation
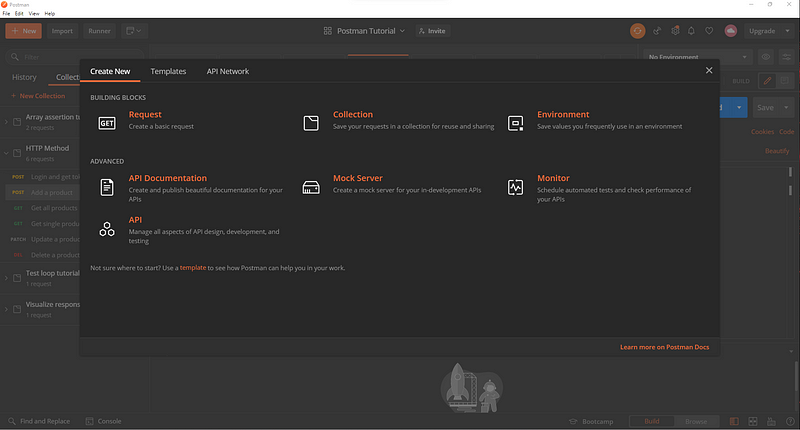
  1. Create a Collection to organize our request — Yes we can create single request without a collection, but a collection will help us to make our request more well organized. We also can group our collection into folders under the same category, such as: Setup, Positive Cases, Negative Cases, and Cleanup.
Collection creation

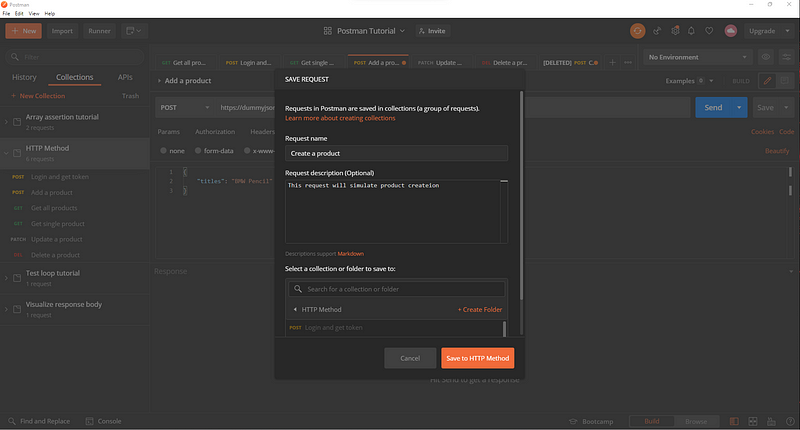
2. Create request — In this step we will create a request. To create a request within a collection, click triple dot from collection then Add Request. Write down Request name and Request description (Optional). Click “Save to HTTP Method”.

Request creation

3. After request is created then we are ready to make a postman request.

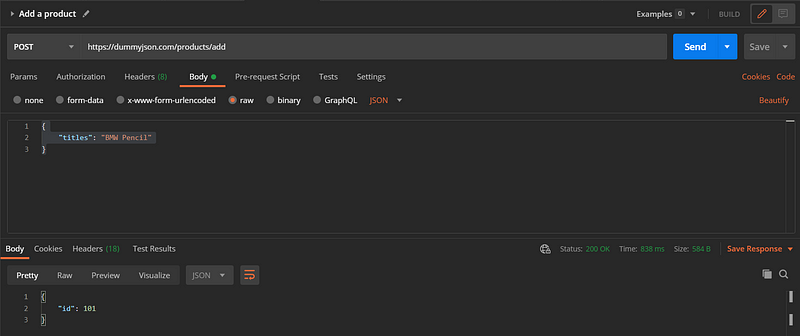
{
“titles”: “BMW Pencil”
}
Request body

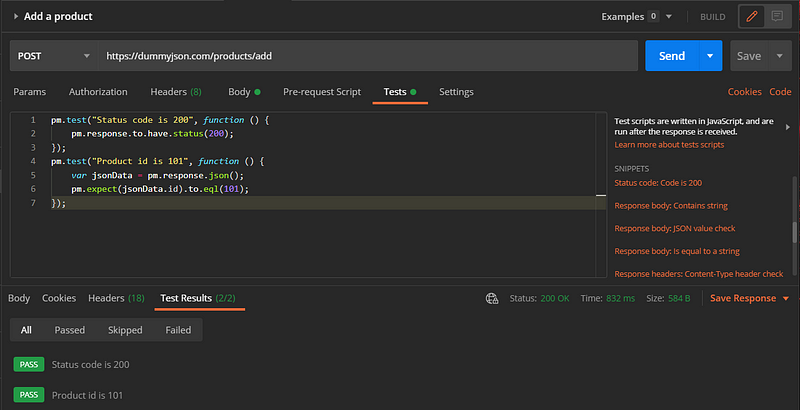
4. Click “Send” button — After this step is executed we already get the result whether fail or success. In this simulation the request return 200 as response code and “id”: 101 as response body.

Request response

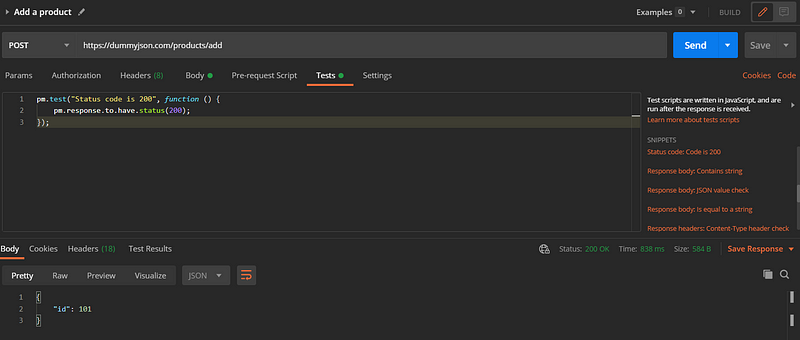
5. Test Assertion — now, after we get the response code and response body, we need to assert the test to assure endpoint returned expected response.

  • To add assertion, click “Tests” tab
  • For this simulation, create an assertion using snippets is enough. So move to snippets and choose on of them.
Test Snippets
  • I will assert this request using two snippets, ”Status code is 200" and “Response body: JSON value check”.
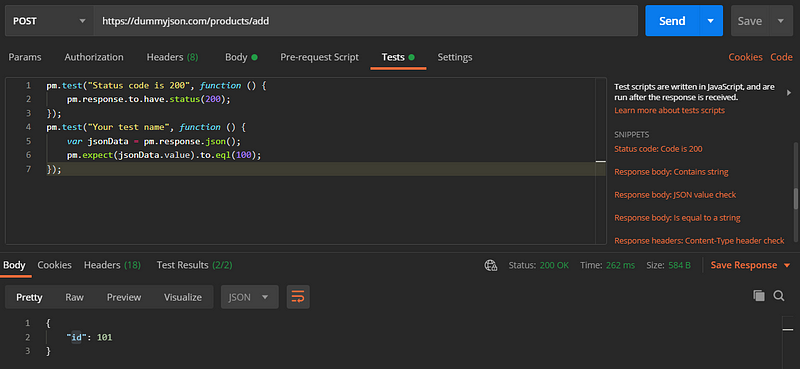
  • Click those snippets. Now we will have two code blocks. The first block is good enough, so we will work on the second block. String “Your test name” can be changed into any string you desire, so I will change it into “Product id is 101”. Because returned Json key is “id” and the value is 101, so we will change “pm.expect(jsonData.value).to.eql(100);” into “pm.expect(jsonData.id).to.eql(101);”
  • I think it is good enough now. Click “Send” button again.
  • In the response click “Test Results” and we will get two results ”Status code is 200" and “Product id is 101”. And both of them are PASS. Those results are from previous test block.

That’s how we create basic API test using Postman. This test is simulating positive scenario. Maybe I will write about how to create negative scenario in the next article.

Thanks for reading.

Follow me on

Facebook: https://www.facebook.com/mydoqa/

Instagram: https://www.instagram.com/mydoqa/

Twitter: https://twitter.com/MydoQa

Resources

[embed]https://dummyjson.com/docs/products[/embed]

In this tutorial I will share how to assert jwt token in the response body. To simulate API behavior, I will use dummy API server from dummyjson.com. You can access the website using the link below:

[embed]https://dummyjson.com/docs/auth[/embed]

In this simulation, I will use endpoint “Login user and get token”. This endpoint is using POST method. For how to test http method using postman you can follow the instruction from the article below:

[embed]https://dummyjson.com/docs/auth[/embed]

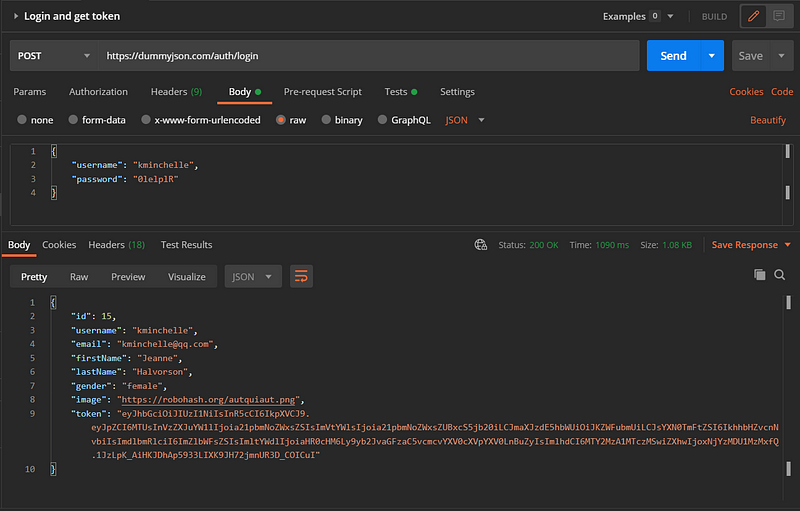
The figure below is the response body for “Login and get token” endpoint. We want to assert the jwt content from “token” field.

Login and get token response body

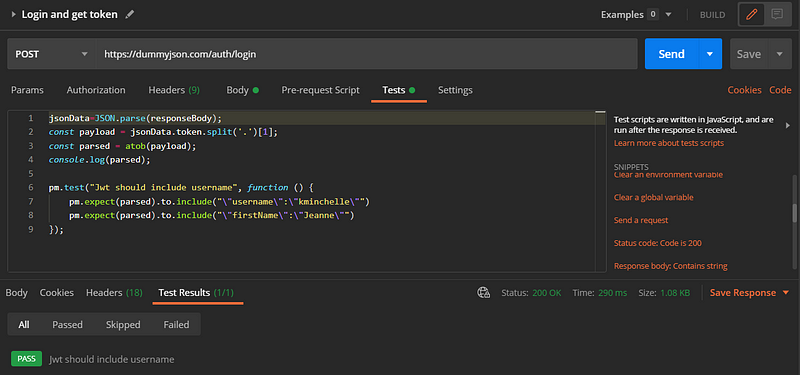
To do that we can use atob(). To use it you can write down the following script in the “Tests” tab.

jsonData=JSON.parse(responseBody);
const payload = jsonData.token.split(‘.’)[1];
const parsed = atob(payload);
console.log(parsed);

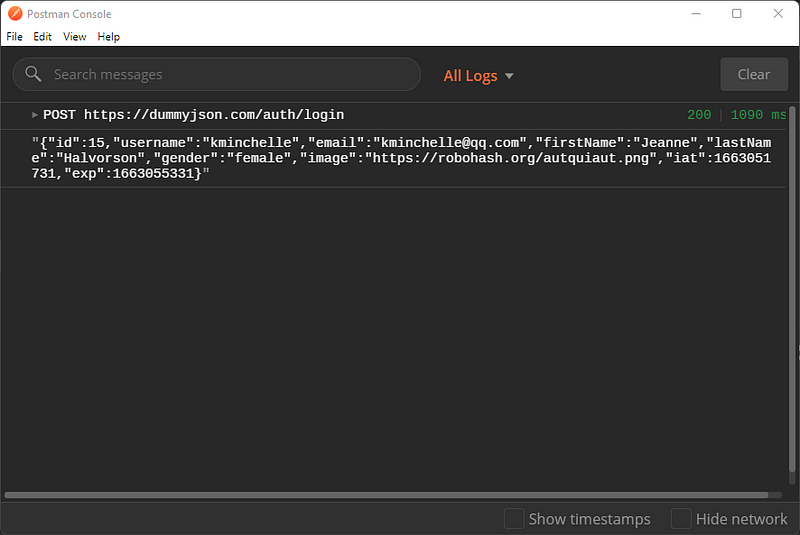
After we hit send button, postman will return log that contains the jwt content. Then we can assert tho content values.

Postman log

To assert jwt token we can add following test script:

pm.test(“Jwt should include username”, function () {
pm.expect(parsed).to.include(“\”username\”:\”kminchelle\””)
});

We can assert another field by adding pm.expect script within the pm.test block, for example jwt token should contain field “firstname” with value “Jeanne“. We can add test script as following:

pm.test(“Jwt should include username”, function () {
pm.expect(parsed).to.include(“\”username\”:\”kminchelle\””)
pm.expect(parsed).to.include(“\”firstName\”:\”Jeanne\””)
});
Login and get token test result

Thanks for reading this article.

Follow me on

Facebook: https://www.facebook.com/mydoqa/

Instagram: https://www.instagram.com/mydoqa/

Twitter: https://twitter.com/MydoQa

Photo by Rubaitul Azad on Unsplash

In this tutorial I will show you what HTTP methods are and how to test them. The methods used in this article are: POST, PUT, GET, DELETE.

  • POST is used to send data to a server to create a resource.
  • PUT is used to send data to a server to update a resource.
  • GET is used to fetch data from a specified resource.
  • DELETE method deletes the specified resource.

Dummy API

This article is using dummy API server provided by DummyJSON.

[embed]https://dummyjson.com/docs[/embed]

API Request

POST

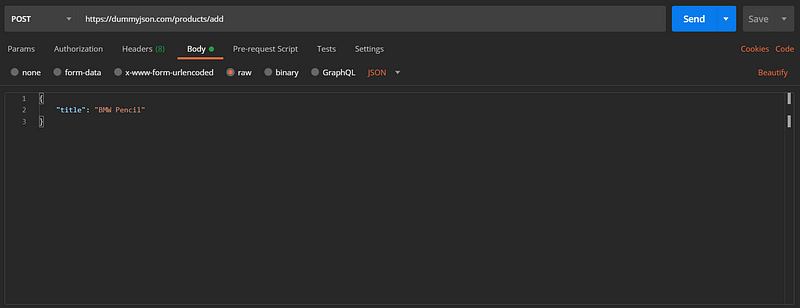
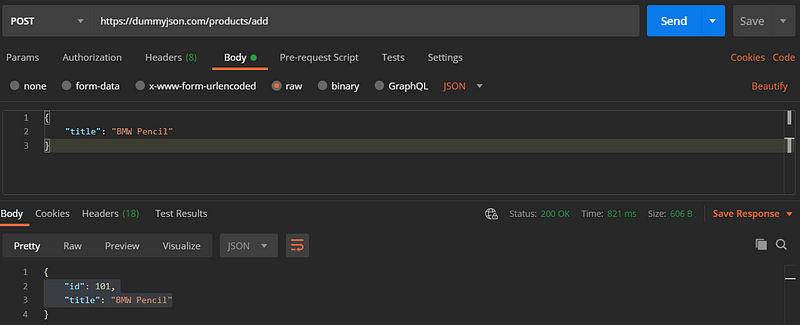
This method will send data to the resource and create a new product called “BMW Pencil”. To do that in Postman, just create new request, ensure the method is POST, Insert the URL of the endpoint. In this simulation, the URL is “https://dummyjson.com/products/add”. In the Body tab, choose “raw” button and choose JSON, and then type:

{
"title": "BMW Pencil"
}
POST Request
  • Request

To make request using Curl you can see the following code. Just import the curl to Postman.

curl --location --request POST 'https://dummyjson.com/products/add' \
--header 'Content-Type: application/json' \
--data-raw '{
"title": "BMW Pencil"
}'
  • Response

After all necessary parameter is fulfilled, click “Send” button, then we’ll get following response body.

{
"id": 101,
"title": "BMW Pencil"
}

PUT

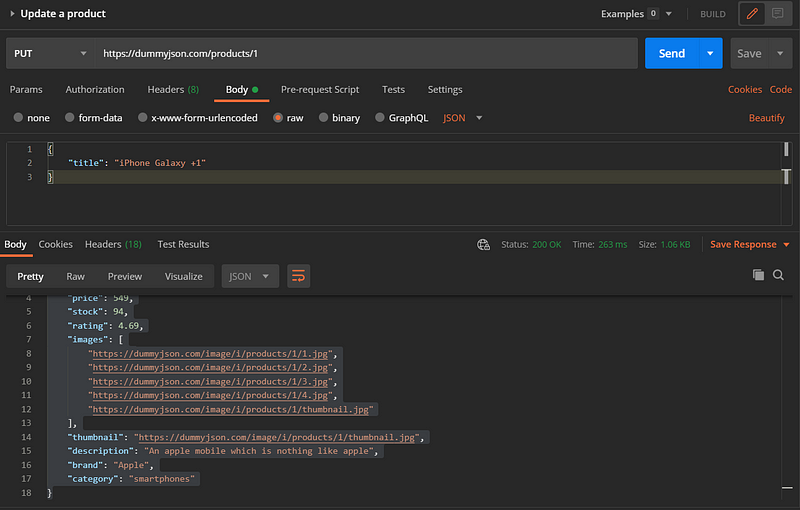
This method will send data to the resource and update a product “1” and change the title into new value “iPhone Galaxy +1”. To do that in Postman, just create new request, ensure the method is PUT, Insert the URL of the endpoint. In this simulation, the URL is “https://dummyjson.com/products/1”. In the Body tab, choose “raw” button and choose JSON, and then type:

{
“title”: “iPhone Galaxy +1”
}
PUT Request
  • Request

To make request using Curl you can see the following code. Just import the curl to Postman.

curl — location — request PUT ‘https://dummyjson.com/products/1' \
--header ‘Content-Type: application/json’ \
--data-raw ‘{
“title”: “iPhone Galaxy +1”
}’
  • Response

After all necessary parameter is fulfilled, click “Send” button, then we’ll get following response body.

{
“id”: “1”,
“title”: “iPhone Galaxy +1”,
“price”: 549,
“stock”: 94,
“rating”: 4.69,
“images”: [
“https://dummyjson.com/image/i/products/1/1.jpg",
“https://dummyjson.com/image/i/products/1/2.jpg",
“https://dummyjson.com/image/i/products/1/3.jpg",
“https://dummyjson.com/image/i/products/1/4.jpg",
“https://dummyjson.com/image/i/products/1/thumbnail.jpg"
],
“thumbnail”: “https://dummyjson.com/image/i/products/1/thumbnail.jpg",
“description”: “An apple mobile which is nothing like apple”,
“brand”: “Apple”,
“category”: “smartphones”
}

GET

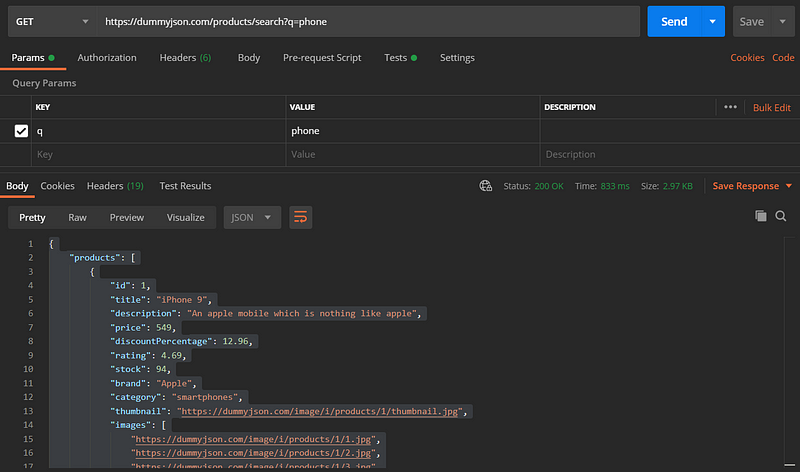
This method will fetch phone data from the resource. To do that in Postman, just create new request, ensure the method is GET, Insert the URL of the endpoint. In this simulation, the URL is “https://dummyjson.com/products/search?q=phone”.

GET Request
  • Request

To make request using Curl you can see the following code. Just import the curl to Postman.

curl --location --request GET 'https://dummyjson.com/products/search?q=phone'
  • Response

After all necessary parameter is fulfilled, click “Send” button, then we’ll get following response body.

{
"products": [
{
"id": 1,
"title": "iPhone 9",
"description": "An apple mobile which is nothing like apple",
"price": 549,
"discountPercentage": 12.96,
"rating": 4.69,
"stock": 94,
"brand": "Apple",
"category": "smartphones",
"thumbnail": "...",
"images": ["...", "...", "..."]
},
{...},
{...},
{...}
// 4 results
],
"total": 4,
"skip": 0,
"limit": 4
}

DELETE

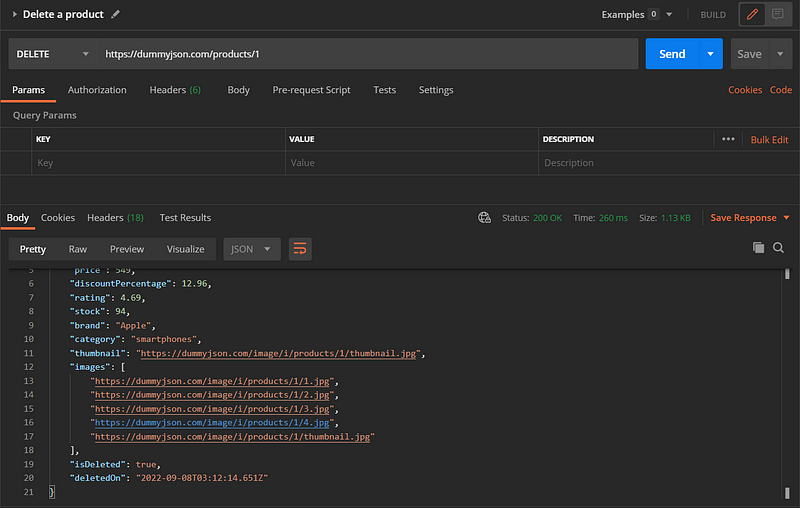
This method will DELETE data with product id “1” from the resource. To do that in Postman, just create new request, ensure the method is DELETE, Insert the URL of the endpoint. In this simulation, the URL is “https://dummyjson.com/products/1”.

DELETE Request
  • Request

To make request using Curl you can see the following code. Just import the curl to Postman.

curl — location — request DELETE ‘https://dummyjson.com/products/1'
  • Response

After all necessary parameter is fulfilled, click “Send” button, then we’ll get following response body.

{
"id": 1,
"title": "iPhone 9",
"description": "An apple mobile which is nothing like apple",
"price": 549,
"discountPercentage": 12.96,
"rating": 4.69,
"stock": 94,
"brand": "Apple",
"category": "smartphones",
"thumbnail": "...",
"images": ["...", "...", "..."],
"isDeleted": true,
"deletedOn": /* ISOTime */
}

Follow me on

Facebook: https://www.facebook.com/mydoqa/

Instagram: https://www.instagram.com/mydoqa/

Twitter: https://twitter.com/MydoQa

RESOURCE

[embed]https://dummyjson.com/docs[/embed]

In this tutorial I want to share my method to iterate a request in postman collection, so it will run several times.

To simulate API response body I create an API mock using mocky. To see my mock API you can click here.

Without a further ado I will demonstrate how to loop a postman request.

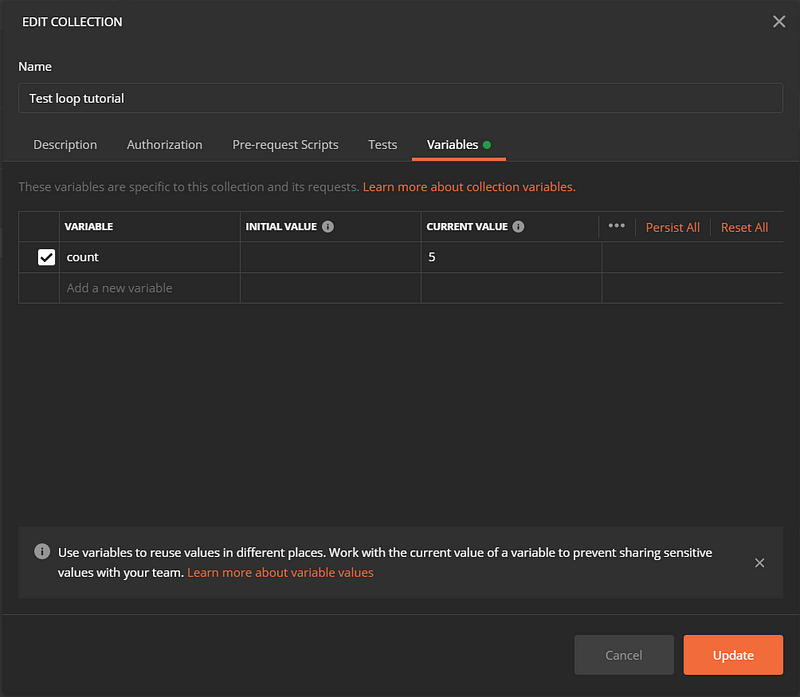
  1. In collection level click Triple dot >> Edit >> Variables
Edit variables

2. In tab Variables tab, type in type in count with current value 5, then click Update. This step will create new variable in collection level.

Collection variables value

3. Create new request. For this simulation I will use request from this story. But I will modify the test script. In the test script add script as follows.

var currentCount = pm.collectionVariables.get("count")
if (currentCount > 0){
currentCount = currentCount -1 ;
pm.collectionVariables.set("count", currentCount);
postman.setNextRequest("Get books detail (loop)");
}

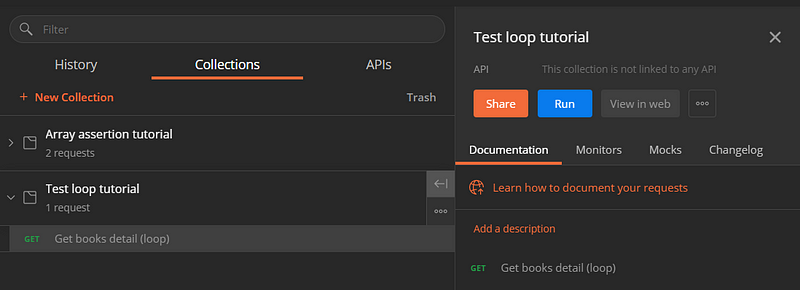
4. Save request and run collection. To make it works, one can’t run the test by clicking “Send” button. We must run it using collection runner.

Collection runner

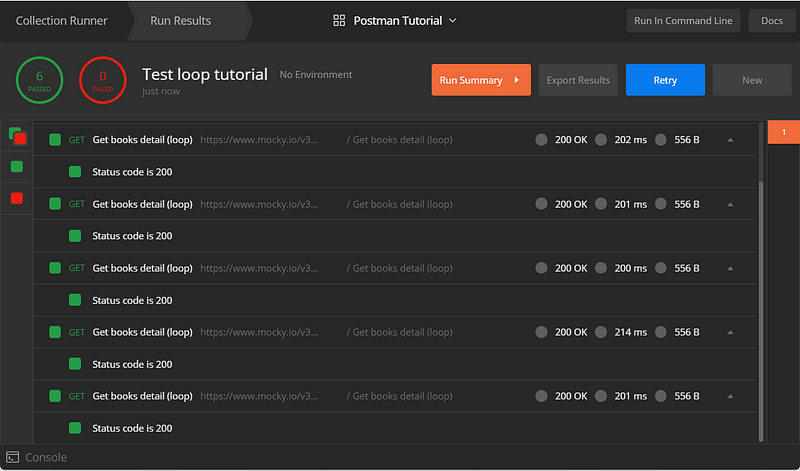
5. Run it and Voila!! we’ll get another 5 request running.

Test result

Thank you for reading my story. Hope it will helps you.

Follow me on

Facebook: https://www.facebook.com/mydoqa/

Instagram: https://www.instagram.com/mydoqa/

Twitter: https://twitter.com/MydoQa

In this tutorial I want to share my method to assert array in response body.

To simulate API response body I create an API mock using mocky. To see my mock API you can click here.

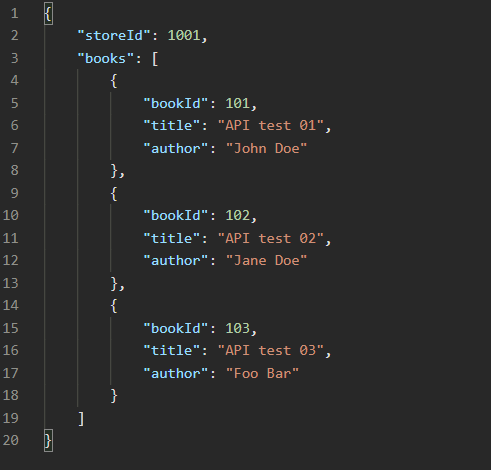
As you can see; I have an API that return array that contains string value. In this scenario, lets assert that book title “API test 01” has “John Doe” as the author.

{
"storeId": 1001,
"books": [
{
"bookId": 101,
"title": "API test 01",
"author": "John Doe"
},
{
"bookId": 102,
"title": "API test 02",
"author": "Jane Doe"
},
{
"bookId": 103,
"title": "API test 03",
"author": "Foo Bar"
}
]
}

Postman Installation

To get postman you can download from their website.

Create Postman Request

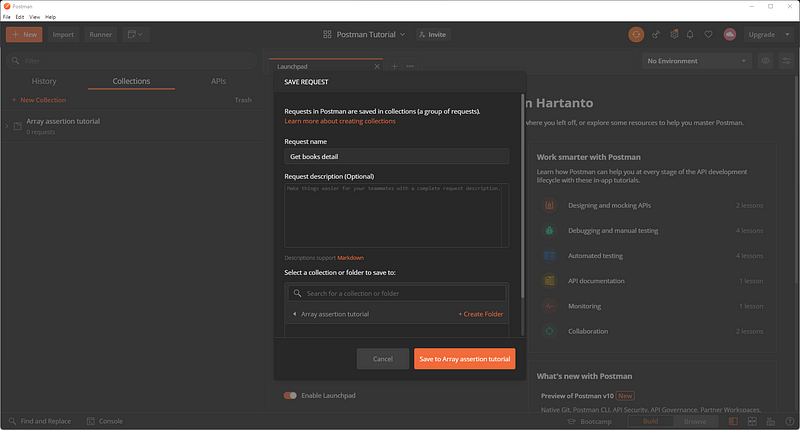
  1. Create a basic request
Create new postman request
Create new postman request

2. Insert url address for the API. This API using “GET” as the method. Then click “Send”

Send API request

3. Then we will get response as below

Response body

Response body assertion

Now, for this scenario, I want to show you, how to assert that book with title “API test 01” has “John Doe” as the author.

First we will isolate each array content into separate array. Then we can do the assertion. To do that we can do the following steps:

  1. In the “Tests” tab, create loop operation to get array elements. To do that, we can use the following script
var jsonData = pm.response.json();
for (let books of jsonData.books){
console.log(books)
}

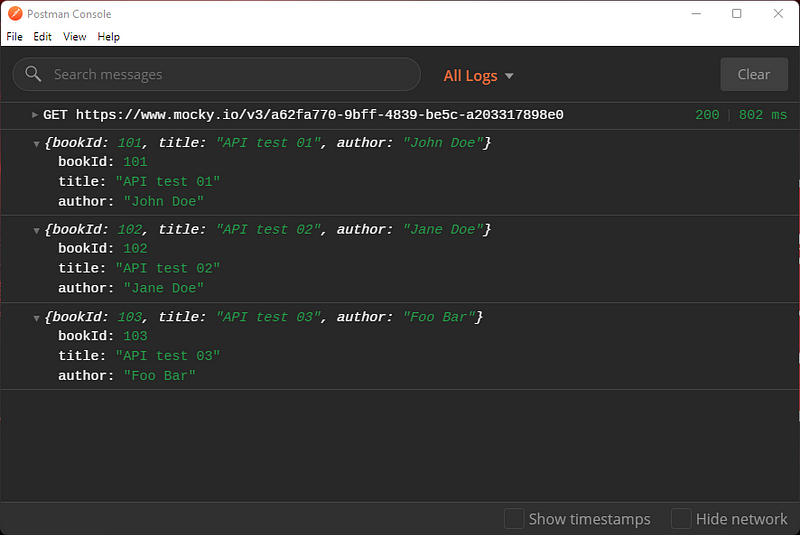
Using that script, the array contents will be divided into separated elements.

Array contents

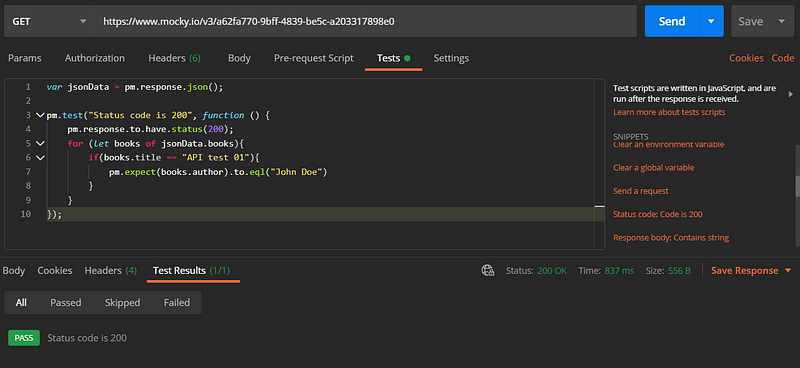
2. After we have individual array, now we can add the assertion in the “for” block.

var jsonData = pm.response.json();
pm.test(“Status code is 200”, function () {
pm.response.to.have.status(200);
for (let books of jsonData.books){
if(books.title == “API test 01”){
pm.expect(books.author).to.eql(“John Doe”)
}
}
});

As we can see, I put all the assertion block in the “pm.test” block. That’s because postman will not treat scripts outside the “pm.test” block as test scripts.

We can clearly see below that the test is pass.

Test result

Conclusion

I will be honored if this tutorial helps you

Follow me on

Facebook: https://www.facebook.com/mydoqa/

Instagram: https://www.instagram.com/mydoqa/

Twitter: https://twitter.com/MydoQa

Find this blog interesting? Follow us